

Note: All images are clickable for enlarging, or can be opened in a new tab
The following Runbook was written for Administrators wishing to stand up their new StorMagic SvHCI virtual infrastructure to create a hyperconverged cluster.
With your purchase of SvHCI on Dell via OEM the Servers will come with the SvHCI hypervisor preinstalled. The following Runbook will help you walk through the process of getting this setup and operational once you have received your equipment.
Prerequisites:
- SvHCI Licenses available.
- iDRAC License Key available.
- 3x IP addresses for the management of the StorMagic devices.
- SvHCI1
- SvHCI2
- Witness
- Storage IP Schema.
- Witness device topology plan.
- Best Practice: DNS server to create A Records ensure network hostname resolvability.
SvHCI / Dell Runbook
Please click in to review different sections
Dell Hardware Delivery
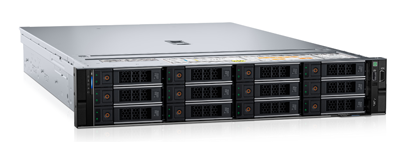
1. Dell unboxing and Hardware Setup
1.1 Unboxing the Server
- Verify all components are present and undamaged.
1.2 Installing Additional Hardware and Connecting Peripherals
- Install RAM, SSDs/HDDs, additional NICs if needed.
- Connect power cables.
- Attach a monitor, keyboard, and mouse for initial setup or if not using iDRAC.
StorMagic Networking Information
2. Network(s) Configuration.
Network Traffic types
SvHCI presents synchronously mirrored block-based disk devices, as a replication factor 2 (RF2) of the virtual machine (VM) disks.
SvHCI has two network traffic types:
- Management – Management
- iSCSI – used by iSCSI initiators to access the iSCSI storage targets
- Mirror Preferred/Failover/Excluded – used by the nodes for synchronization and live migration traffic
You can define which traffic type is allowed over each of your network interfaces.
In addition, you can define which interfaces are allowed to be used for mirror traffic, including specifying preferred interfaces.
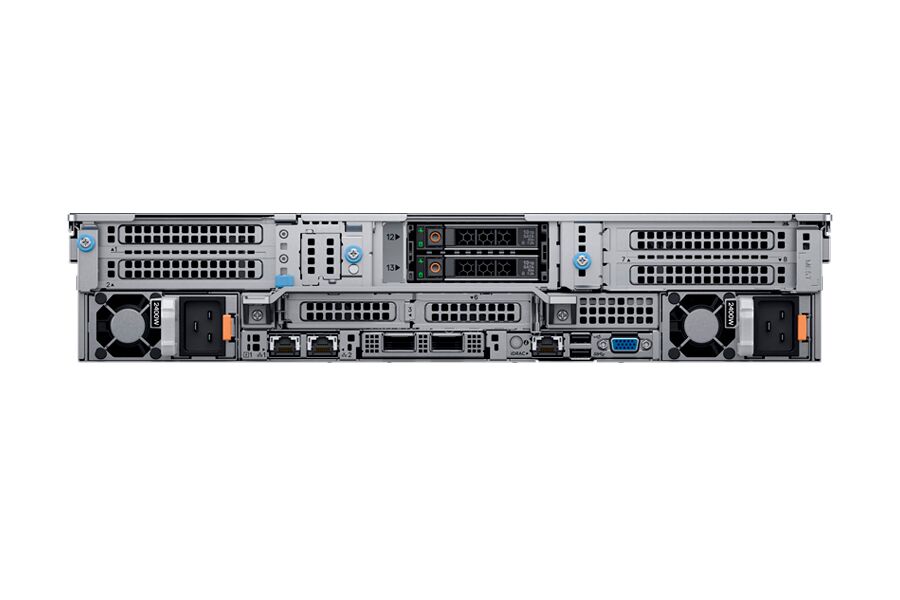
The use of back-to-back or direct attach (DAC) cables frees up switch ports, enables load balancing, and potentially enables 10 Gb speed without the need for a 10 Gb switch.
Note the back-to-back links are on two logical vSwitches and two different IP subnets. This is important to prevent issues with the host routing IP traffic to the NIC it cannot reach due to the directly connected cabling.
- SvHCI fully supports back-to-back or direct attach cabling and is preferred for the Storage/infrastructure network.
- Verify network cabling is setup per best practices.
- Power the server on to start it if this hasn't been done.
•1x Broadcom BCM5719 1Gb quad port (QP) Base-T NIC
•1x Broadcom BCM57414 10Gb/25GB SFP28
BCM57410 High-Performance 10GbE/25GbE/40GbE/50GbE Solutions
Configuring Initial iDRAC Access
3. Configuring Initial iDRAC Access (Dell PowerEdge)
Purpose:
Required to allow remote management, hardware monitoring, and remote mounting of ISO files for OS or hypervisor installation.
Prerequisites
Physical access to the server (initial boot)
Network connectivity to the iDRAC management interface
iDRAC Enterprise license recommended (required for virtual console & virtual media)
3.1 Access iDRAC Settings During Boot
Power on or reboot the server.
When prompted during POST, press
F2to enter System Setup.Navigate to:
iDRAC Settings → Network
3.2 Configure iDRAC Network Settings
Configure the iDRAC management interface:
-
NIC Selection
Dedicated iDRAC NIC (recommended), or
Shared LOM if dedicated NIC is unavailable
-
IP Configuration
Disable DHCP (recommended for servers)
-
Set:
Static IP Address
Subnet Mask
Default Gateway
DNS Servers (optional but recommended)
-
Enable IPv4
Ensure IPv4 is enabled
Disable IPv6 unless explicitly required
Save changes before exiting.
3.3 Verify iDRAC is Enabled
Navigate to:
iDRAC Settings → General-
Confirm:
iDRAC = Enabled
LAN interface = Enabled
IPMI over LAN = Enabled (if required by tooling)
3.4 Configure iDRAC User Credentials
Navigate to:
iDRAC Settings → User Configuration-
Modify the default administrator account or create a new admin user:
Assign Administrator privileges
Enforce strong password requirements
Disable or rotate default credentials per security policy.
3.5 Apply and Exit
Save all changes.
Exit System Setup.
Allow the server to complete boot.
3.6 Validate iDRAC Access
From a management workstation:
Open a browser and navigate to:
https://<iDRAC-IP>Log in using the configured credentials.
-
Verify:
System health visible
Virtual Console launches
Virtual Media options available (Enterprise license)
Note: True up - Please match the 2-nodes configuration to this point if utilizing a cluster.
First-Boot Configuration
4. First-Boot Configuration
- Log in to SvHCI Web Interface (
https://<Node-IP>). - Username: admin Password: password (default given on installation to be changed).
- Check to accept the licensing agreement.
- Review and select next.
- Apply a SvHCI license key.
When applying a license key the device will reach out to the StorMagic license server for the node to receive the proper license information. If the environment is being setup on a closed site or doesn't have outside access yet the keys can be applied via an offline method. For the steps for offline licensing can be found at the link below.
SvHCI & SvSAN Online and Offline Licensing – StorMagic
- Review the updated information the node received is correct per your purchase.
- Apply a Hostname and Domain.
- Create a new strong secure password thus changing the default one created on install.
- Confirm and select Finish. (The password change triggers the need to log in again).
Note: True up - Please match the 2-nodes configuration to this point if utilizing a cluster. 
- Login to the web interface again.
- Username: admin Password: <Your new password>
4.1 SvHCI Networking:
SvHCI Configure networking – StorMagic
- StorMagic SvHCI web interface upon signing back in for the first time with the new settings.
- Network Information on the Management interface that was created during the installation.
- Create a Port Group on the LAN vSwitch for your VMs.
- Apply any necessary VLANs.
- Click apply.
- Create another vSwitch for the first SAN (Storage Area Network) this will be used for the mirror traffic.
- Select to create bottom left, an interface on this switch for the Sync / Mirroring.
- Give it a name, uncheck the DHCP, supply an IP and subnet mask.
- Supply the necessary VLAN if using them.
- Leave the box unchecked for Management and check the box for iSCSI which will check the second automatically as well.
- Set the Mirror Traffic Policy to "Preferred". This will make this the primary route for the storage traffic and will only use the management network as a faiDRACver in a worst case.
- Click Create.
- Create another vSwitch for the second SAN (Storage Area Network) this will also be used for the mirror traffic.
- Create a network interface on the SAN2 vSwich for the storage traffic.
- Give it a name, uncheck the DHCP, supply an IP and subnet mask.
- Supply the necessary VLAN if using them.
- Leave the box unchecked for Management and check the box for iSCSI which will check the second automatically as well.
- Set the Mirror Traffic Policy to "Preferred". This will make this the primary route for the storage traffic and will only use the management network as a faiDRACver in a worst case.
- Click Create.
- Complete basic but best practice networking setup for running StorMagic SvHCI.
4.2 SvHCI Storage Pools:
SvHCI & SvSAN Pool licensing – StorMagic
- Storage Pool view. Notice the pool meant for the shared storage has a generic name that was generated starting with a P. This means the pool was created on deployment when the storage was handed up RAW.
- Select the pool with the generic name starting with the P and select edit pool.
- Give it a new name and select apply.
- New Storage Pool view with a Boot pool (Local DS) and a Shared Pool for the mirroring of targets.
Note: True up - Please match the 2-nodes configuration to this point if utilizing a cluster.
At this stage you will want to ensure you have two servers running SvHCI. The next stages include deploying a StorMagic Witness and creating the cluster. Therefore, it's a good point to do a check to make sure we have two single hosts ready to make a cluster.
4.3 SvHCI Witness Installation:
Witness for mirrored targets
To provide full data integrity in case of failure of a mirrored target, it is recommended to use a witness. A witness holds mirror state and acts as arbiter when the two sides of the mirror are uncertain as to which has the correct state. A witness is a third-party machine with the StorMagic Witness Service deployed to it. The Witness Service can be deployed to either a Windows or Linux OS on either a physical machine, or a virtual machine (off the HA cluster). The witness deployment procedure varies depending on the machine that you chose to host the Witness service. When you use a witness, your mirrored targets should use the Majority mirror isolation policy. Although not suitable for all environments StorMagic also offers a WaaS Witness as a service that comes free now with SvHCI.
Note: Please see the following link for correspondents for your environment. https://support.stormagic.com/hc/en-gb/articles/4418754965777-StorMagic-Witness-Supporting-SvHCI-SvSAN-Deploy-Install-Upgrade-and-Migrate
SvHCI Cluster Creation
5. SvHCI Cluster Creation:
SvHCI Cluster Creation – StorMagic
- Select the Discovery tab to view the cluster details.
- Select the Join button.
- Select the other host to add and the Witness to be used.
- Click Apply.
- New Cluster view Showing two SvHCI hosts and a Witness.
Post Deployment Validation
6. Post-Deployment Validation
6.1 Network Connectivity Testing
Test remote access:
- Access iDRAC. Open
https://<Hosts static iDRAC ip>. - Access SvHCI. Open
https://<Hosts static SvHCI management ip>. - Access any created VMs to verify access over the VM Network / Management network.
Test Connectivity:
- You can utilize the onboard Ping tool to run different connectivity tests.
- You can utilize the onboard Traceroute to also run different connectivity tests.
Within the SvHCI dashboard there are some performance testing tools within the Networking tab these tools are basic but can help verify setup or test for networking issues.
- Network Speed Test.
This is set up with one side as a server and the other side the client. Then it is used to test the speed over a specific network interface. The next three images are the complete test. Server, client, results.
- Network IO Path test
The ability set specific parameters to run a test that will provide test results around Throughput, IOPS, and Latency. The first image is the setup and the second is the results.
6.2 Verify SvHCI Storage Functionality.
- Upload iSO's to start building VMs. SvHCI ISO or RAW Disk image Upload – StorMagic
- Create Windows guest VMs SvHCI Windows VM Creation – StorMagic
- Create Linux guest VMs. SvHCI Linux Guest VM Creation – StorMagic
Resources for working with guest VMs & SvHCI.
SvHCI Guest VM Resource Handling – StorMagic
VM disk (VMDK/VHD) Copy, Conversion & Import of a Linux guest from VMware to SvHCI – StorMagic
SvHCI Create a VMDK/VHD>RAW Disk Converter Virtual Machine (VM) – StorMagic
Validating Built for Redundancy and Uptime
7.Validating built for Redundancy and uptime.
7.1 Ensuring High Availability.
Following the installation of the DELL Gen11 Microservers with SvHCI it is always best practice to test the environment and ensure everything was configured properly and the configuration took as expected. Following is a link to evaluators guide that has both steps and videos that walk through the testing procedures.
- StorMagic SvHCI Evaluators Guide – StorMagic
- High Availability (HA) Virtual Machine (VM) FaiDRACver Test
7.2 Monitoring, Maintenance and DRP (Backups).
- Set up one of the options for reporting to receive event notifications. https://support.stormagic.com/hc/en-gb/articles/5203720099997-SvHCI-SvSAN-Reporting-Notifications-Alerts
- Monitor performance via SvHCI Dashboard. From the Targets tab select statistics.
- View the Statistics page for your targets and verify there's no real concerns in the performance.
- Check Cluster Health often. Check for Synchronization, proper sessions, networking issues.
- Update SvHCI & BIOS as needed staying up to date on what both DELL and StorMagic recommend as advised firmware.
The below screenshots are firmware upgrade locations. However, when using SvHCI in a production environment when updating anything the following guide should be used to help ensure the updates happen while keeping the guest VMs operational. SvHCI Upgrade SvHCI non-disruptively – StorMagic
- SvHCI systems tab >> Upgrade Firmware.
- SvHCI System Firmware upgrade page.
Resources for Setting up backups with Veeam.
Agent Based Veeam Backup of Guest VMs on StorMagic SvHCI – StorMagic
Agent Based Veeam Restore Process of Guest VMs on StorMagic SvHCI – StorMagic
Additional Information
SvHCI install video on similar DELL hardware
2x DELL DL325 Gen11. Video created by StorMagic Technical Services. https://youtu.be/DqWqOnAI82w
For questions or support please contact: StorMagic
Note: The StorMagic SvHCI ISO does NOT support secure boot. Secure Boot should be disabled in the hardware BIOS similar to the following link: https://support.DELL.com/DELLsc/public/docDisplay?docId=sd00001068en_us&page=GUID-D7147C7F-2016-0901-0A72-000000000C06.html&docLocale=en_US
Comments
0 comments
Article is closed for comments.